VSCode + 微控制器 (1) PIC系列的開發環境
想用VSCoded開發PIC系列。微控制器 Micro-Controller 接觸多年,大學時代Assembly就開始玩,現在都是 C/C++;開發環境越來越方便,雖然工作上使用 PIC18, PIC16; STM32....等微控制器,各有其專屬的IDE,但是手邊有多種MCU,所以想都盡量改用 VSCode. 首先是 PIC系列~~

由於現在的開發環境,都是以圖形介面 / 選單,自動生成專案的底層 Driver (例如 Timer, UART, I2C, SPI,...等)所以,這部分還是必須使用原公司的 IDE工具。然後為了程式撰寫能用上 VSCode的強大功能,需要建立的是編譯和燒錄的部分
再者,公司裡一定有很多舊專案需要維護,甚至是中國大陸那邊的 Code,那麼閱讀別人的程式碼, VSCode 也有一定的優勢,尤其是遇到全部寫在一個又臭又長的 main.c 還有簡體中文註解.


先說我們的目標,就是建立 task.json 檔案,裡面含有三個常用工作:

由於現在的開發環境,都是以圖形介面 / 選單,自動生成專案的底層 Driver (例如 Timer, UART, I2C, SPI,...等)所以,這部分還是必須使用原公司的 IDE工具。然後為了程式撰寫能用上 VSCode的強大功能,需要建立的是編譯和燒錄的部分
再者,公司裡一定有很多舊專案需要維護,甚至是中國大陸那邊的 Code,那麼閱讀別人的程式碼, VSCode 也有一定的優勢,尤其是遇到全部寫在一個又臭又長的 main.c 還有簡體中文註解.


先說我們的目標,就是建立 task.json 檔案,裡面含有三個常用工作:
- build
- clean
- programming
首先,其實 PIC的開發環境,也是有使用 make file 可以從專案目錄觀察到

而 make 相關工具的執行檔,其實就在 MPLAB XIDE 的安裝目錄之下,以我為例,即是在
C:\Program Files (x86)\Microchip\MPLABX\v5.30\gnuBins\GnuWin32\bin
目錄之下。

然後,我的燒錄工具是 PICkit3,(沒在用什麼單步執行之類的,習慣上所有專案都使用一個UART 輸出 printf(),用來列印 debug 訊息;在 Timing敏感的地方,就使用 GPIO做波形出來,配合邏輯分析儀,這樣就很好用了~~)
要驅動 PICkit3 其實是呼叫 Microchip公司的 debugger: MDB,在我電腦中的目錄是
C:\Program Files (x86)\Microchip\MPLABX\v5.30\mplab_platform\bin
這個目錄之下

知道以上目錄,就可以編寫 task.json
如下所示,可以直接拷貝~~
有關燒錄工作,需要寫一個 script檔,我是固定放在專案目錄下的 .vscode 目錄之下,取名為 progr.cmd,內容如下;以後各個專案需要修改的是第一行 device,還有第四行的燒錄HEX檔
我們使用的時候,從終端機>執行工作...,然後就有選單可以選擇並按下


另外,
為了讓程式碼盡量少『紅線』,需要在 c_cpp_properoties.json 檔案中:
這樣的環境,編譯時的問題錯誤,都有醒目顏色,也可以快速連結過去;
算很不錯!

最後一點,燒錄結束時,終端機跳出"按任意鍵"那行時,會卡住 MCU的執行,此時有兩個解決方式:
~~~~~~~~~~~~
如下所示,可以直接拷貝~~
{
    // See https://go.microsoft.com/fwlink/?LinkId=733558
    // for the documentation about the tasks.json format
    "version": "2.0.0",
    "tasks": [
        {
            "label": "build",
            "command": "C:/Program Files (x86)/Microchip/MPLABX/v5.30/gnuBins/GnuWin32/bin/make",
            "args": [
                "build"
            ],
            "type": "shell",
            "problemMatcher": [
                "$go"
            ],
            "group": {
                "kind": "build",
                "isDefault": true
            }
        },
        {
            "label": "clean",
            "command": "C:/Program Files (x86)/Microchip/MPLABX/v5.30/gnuBins/GnuWin32/bin/make",
            "args": [
                "clean"
            ],
            "type": "shell",
            "problemMatcher": [
                "$go"
            ]
        },
        {
            "label": "programming",
            "command": "C:/Program Files (x86)/Microchip/MPLABX/v5.30/mplab_platform/bin/mdb.bat",
            "args": [
                ".vscode/prog.cmd"
            ],
            "type": "shell",
            "problemMatcher": [
                "$go"
            ]
        }
    ]
}
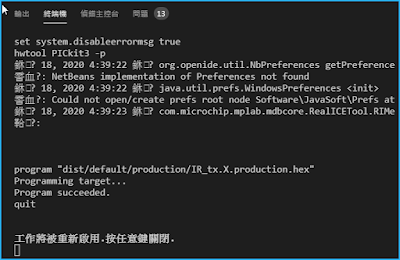
有關燒錄工作,需要寫一個 script檔,我是固定放在專案目錄下的 .vscode 目錄之下,取名為 progr.cmd,內容如下;以後各個專案需要修改的是第一行 device,還有第四行的燒錄HEX檔
device PIC18F45K20
set system.disableerrormsg true
hwtool PICkit3 -p
program "dist/default/production/IR_tx.X.production.hex"
quit
我們使用的時候,從終端機>執行工作...,然後就有選單可以選擇並按下

另外,
為了讓程式碼盡量少『紅線』,需要在 c_cpp_properoties.json 檔案中:
- 指向 xc8-cc.exe
- 增加 include Path
我某專案的例子如下:
{
    "configurations": [
        {
            "name": "Win32",
            "includePath": [
                "C:\\_0AJ\\0_work\\Jacky_UWB\\4_src\\IR_tx.X\\*",
                "C:\\_0AJ\\0_work\\Jacky_UWB\\4_src\\IR_tx.X\\\\mcc_generated_files\\*",
                "C:\\Program Files (x86)\\Microchip\\xc8\\v2.10\\pic\\include\\pic18f45k22.*"
            ],
            "defines": [
                "_DEBUG",
                "UNICODE",
                "_UNICODE"
            ],
            "compilerPath": "C:/Program Files (x86)/Microchip/xc8/v2.10/bin/xc8-cc.exe",
            "cStandard": "c11",
            "cppStandard": "c++17",
            "intelliSenseMode": "clang-x64"
        }
    ],
    "version": 4
}
這樣的環境,編譯時的問題錯誤,都有醒目顏色,也可以快速連結過去;
算很不錯!

- 拔開 PICkit3 程式即開始執行(有另外接的電源)
- 若 PICkit3所接的USB hub 有單獨開關的話, 關掉重開,即可!

~~~~~~~~~~~~
相關的資料主要是這幾篇:


留言
張貼留言